Manual button routing
To manually set the routing for individual menu buttons:
- Double-click the menu’s icon in the Project window. The menu appears in the Preview window.
- In the Preview window, click the button whose routing you want to define. The Attributes window displays the button’s attributes.
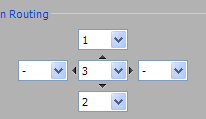
- Click the Routing tab in the Attributes window. The tab shows the routing for the button you just selected. The center drop-down list contains the button’s number:

The other drop-down lists show which buttons will become highlighted when a viewer presses the remote control’s navigation buttons. For example, if you selected button number 2 and the top drop-down list shows 1, it means that the selection will move from button 2 to button 1 when the viewer presses the remote control’s Up arrow key.
If no number is displayed in a drop-down list, it means nothing will happen (the selection will not change) if the viewer presses the associated navigation key:

In this example, the selection will not move if the viewer presses the remote control’s Left or Right arrow keys.
- Choose the desired button routing in the Up, Down, Left, and Right drop-down lists.
After setting the button routing, you should simulate the project to see the effect. See Simulating disc playback for instructions.
Note: When you define the button routing manually, it is possible to “isolate” a button by having no routing links to or from it. If a button has no routing links to any other button on the menu, the viewer can only select it by pressing the correct button number on the remote control keypad.